
Did you know you can inspect your node application's memory without instrumenting your code? It's possible using a tool called mdb_v8. With mdb_v8 we can produce a core dump of a running node process, and then later inspect the memory at the time the core dump was generated. This leads to some powerful postmortem debugging capabilities.
In this post I'm going to walk you through setting up mdb_v8 locally so that you can inspect your node application's memory. Recently I went through this exercise myself and realized there was no good guide to do so. I decided to document the process and post it here.
The steps were going work through are as follows:
-
Generate a core dump of our running node application
-
Install a Solaris derivative in a VM
-
Install mdb_v8, and run it against the core dump
Be aware that this guide assumes a couple things about your workflow. First, that you are using a version of node at 0.10 or greater. At the time of this writing, all previous versions are no longer supported. Second, that your node service is running on a system where gcore is available, such as linux.
A Solaris derivative is required to run mdb_v8. There are two post mortem debuggers that don't require Solaris, but they aren't as fully featured. These are llnode and lldb_v8. Alternatively, if instrumenting your code isn't an issue you may want to look into node-heapdump.
What is mdb_v8 anyways ?
We can't talk about mdb_v8 without first talking about mdb. mdb is a low-level debugger developed by Sun for the Solaris operating system. What makes it unique is that is extremely extensible. It is possible to extend the tool with custom modules ("dmods") for different contexts. This is exactly what Joyent has done with their mdb_v8 module. The mdb_v8 module adds a new set of commands instrumented specifically for the v8 javascript engine and node.js. It includes commands that allow you to inspect the application state, javascript frames, and javascript objects on the heap at the time the core dump was generated.
It's worth emphasizing here that mdb only works on Solaris derivatives. That is -- it won't run OS X, Windows, or Linux. More on this in a moment.
Generating a core dump
A core dump is a file which consists of the working memory of an application. It also typically contains some other metadata such as process registers. In linux generating a core dump of our node.js application manually is pretty straight forward. We just run the following command:
> gcore -o filename pidThis will produce a core dump file.
You can also set up your node service to save a core dump when it crashes by using the --abort_on_uncaught_exception flag.
Installing mdb_v8
So mdb_v8 sounds great, right ? You will be able to inspect your application state, and find out where all of your sneaky memory leaks are hiding. Well, that's true, but as I mentioned above mdb_v8 only works on Solaris.
Therefore, we will use VirtualBox to install a Solaris derivative (OmniOS).
Setting up VirtualBox with OmniOS
If you don't already have VirtualBox installed, you can proceed to the downloads page to download the correct binary for your system and install it.
:arrow_down: Download VirtualBox
After you've installed VirtualBox you will download a Solaris derivative. Here we will use OmniOS. Download the current/stable release under "From CD/iso"
Once you've downloaded the image you can move back over to VirtualBox.
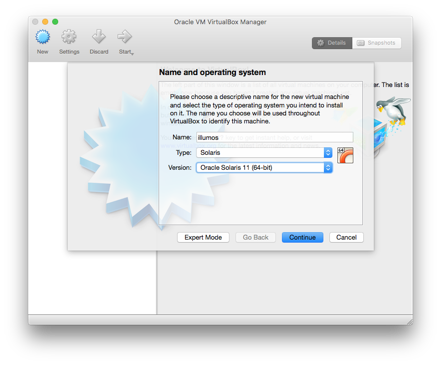
Select "Oracle Solaris 11", and continue with everything else as the default.
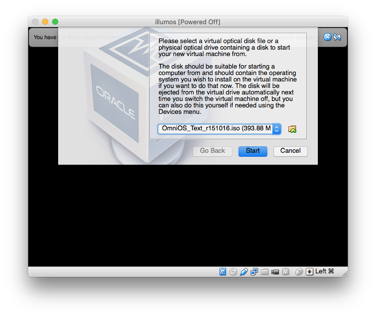
Once the VM is running, start it up and choose the OmniOS image that you downloaded above.
Proceed through the installation process choosing your language, timezone, etc. Keep in mind that VirtualBox has a sandbox auto-resizing hard drive. It's fine to install the image on the "whole disk". You can also ignore any warnings about kvm: No hardware support.
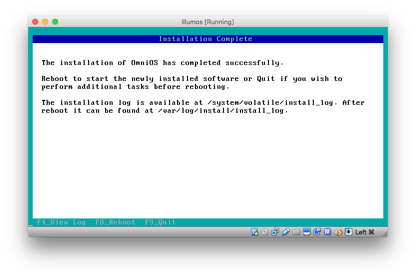
After you've installed OmniOS, proceed to "Devices -> Optical drives -> Remove disk from virtual drive" in VirtualBox to unmount the disk. Finally, reboot the VM. You will be prompted to login once OmniOS starts up. The default login in OmniOS is root with no password.
Utilizing mdb_v8
If you've made it this far you should be staring at an empty shell. There are still a few remaining steps before we can begin using mdb_v8. Those steps are as follows:
-
We need to be able to SSH into our VM from our local machine
-
We need to install the mdb_v8.so module for mdb
-
We need to SCP our core dump, and node.js binary to the virtual machine
SSHing into our VM
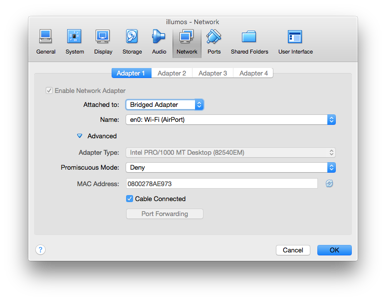
The first issue is that our VM doesn't have access to the local network. We need to enable this option in VirtualBox. We want to give our VM an internal IP that we can reach via SSH. We can do this by right clicking our VM in VirtualBox, and heading to the settings page. Here we will change our networking adapter from NAT to Bridged Adapter.
The next step is that we need to enable DHCP in OmniOS. This way our VM can be assigned an IP address on the network. We do that by using a tool called ipadm to create an IP interface.
> ipadm create-if e1000g0
> ipadm create-addr -T dhcp e1000g0/v4
Now that we have created our IP interface we can configure our DNS resolution. Run these commands to add a nameserver.
> echo 'nameserver 8.8.8.8' >> /etc/resolv.conf
> cp /etc/nsswitch.dns /etc/nsswitch.conf
Hurray. Now we have network connectivity. Now let's get our new local IP on the network by running ifconfig.
> ifconfig e1000g0This will show us our local network IP address (directly after the inet).

Even though we have the network IP address, we still won't be able to SSH into the machine. Why ? Well because by default OmniOS (and many distributions) don't allow you to SSH in as the root user. This is typically a security precaution. However, because we are just doing this to run mdb_v8 locally, we can enable this functionality.
To allow us to SSH in as root we can edit the sshd_config
> vim /etc/ssh/sshd_configand scroll down to the line that says PermitRootLogin no and change it to PermitRootLogin yes. After this we want to restart the SSH daemon.
> sudo svcadm restart SSHNow we should be able to SSH into our VM. Nice! On to the next step.
Installing mdb_v8
Luckily, OmniOS comes with mdb installed by default, but it does not come with the mdb_v8 module. We need to manually install this. To do this we can simply use curl to download the binary.
Let's first create a working directory.
> mkdir ~/mdbv8
> cd ~/mdbv8
You can first curl Joyent's manta service to find the latest version of mdb_v8.
> curl https://us-east.manta.joyent.com/Joyent_Dev/public/mdb_v8/latest | cut -c 27-Run the following command below (replace {version} below with version you got from the above curl i.e. "v1.1.2")
> curl -O https://us-east.manta.joyent.com/Joyent_Dev/public/mdb_v8/{version}/mdb_v8_amd64.soGreat. Now we have everything we need to run mdb_v8.
Putting it all together
The last and final step is to move over both our core dump file(s), and our node binary. (Don't have a core dump file ? See the beginning of this post for a snippet of how to use gcore.)
What's all this about a node binary ? Well, mdb_v8 will only work against the node binary that was running your node application at the time that the core dump was generated. You can download it directly from the node.js website provided you know the exact version and build. The easiest way is to simply grab the node binary off of the machine where you took the core dump. Typically you can find the node binary by running which node, but if you're using something like nvm it may require a little bit more digging.
Provided you have downloaded the node binary and your core dump on your local machine, you can now SCP these files onto your VM.
> scp ./node root@192.168.1.82:~/mdbv8
> scp ./my-dump.gcore root@192.168.1.82:~/mdbv8
Now we can start the mdb_v8 debugger against our core dump and node binary.
> mdb ./node ./my-dump.gcoreThis will drop us into the mdb shell. All we need to do now is to load the mdb_v8 module by executing:
::load /root/mdbv8/mdb_v8_amd64.so💥 Now we can proceed to run any of the mdb_v8 commands against our core dump.
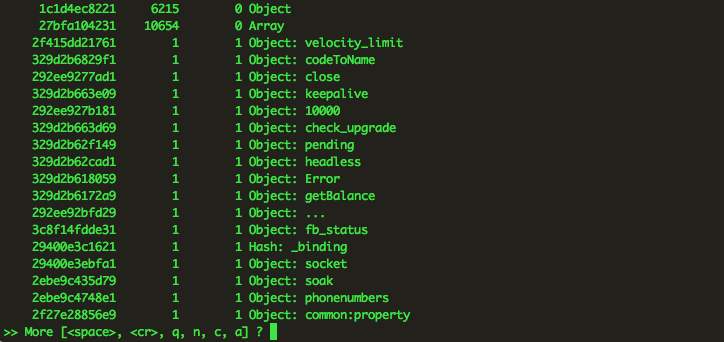
I like to start my mdb_v8 search by listing all js objects in memory. Try it yourself by typing.
::findjsobjectsFor a list of useful mdb_v8 commands I recommend the official mdb_v8 usage guide.
I also found this gist by tjfontaine to be pretty helpful.
Summary
In this guide I've walked you through generating core dumps, installing solaris locally, and setting up mdb_v8. Hopefully you will find that mdb_v8 is a very useful node.js debugging tool to have in your back pocket for postmortem debugging. Good luck plugging all your leaks! 🚱